What is LVM?
LVM is a special tool in Linux that let’s you manage disk storage in much more flexible way than traditional partitions.
Think of it as turning multiple hard drives into a big, flexible stroage pool that you can split, resize, or grow whenever you want, without worrying about the limits of classic disk partitions.
Why Use LVM?
- Resize storage easily: You can expand or shrink volumes without reformatting or losing data.
- Combine multiple disks: Make many drives look like one big storage area.
- Add more space anytime: Plug in new hard drive and add its space instantly.
- Move or migrate data: Shift storage between drives with little downtime.
- Take snapshots: Save the exact state of you data at a moment in time, which helps with backups.
Practical Example
Classic Partitioning (without LVM)
- You have 100GB disk with
/homeand/varpartitions. /homefills up, while/varhas lots of free space.- Problem: You can’t take space from
/varand give it to/homewithout migrating, deleting, repartitioning or copying data aroud. Which is possible but risky and time-consuming.
With LVM
Let’s say you have two physical disks:
- Disk 1: 100GB
- Disk 2: 200GB
You do the following:
- Initialize the disks as LVM Physical Volume (PV).
- Combine them into a Volume Group (Vg); Eg:
testvg, making it a single 300GB storage pool. - Create Logical Volume inside that pool, for example:
lv_homefor your/homedirectory:150GB.lv_varfor your/vardirectory:50GB.
If /home is getting full, you can:
- Shrink
lv_varto 25GB (only if it has enough space). - Grow
lv_hometo 175GB.
To add more space in the future:
- Plug in a new disk.
- Add it to the volume group, after making a physical volume out of it.
- Instant make the space available to any logical volume you choose.
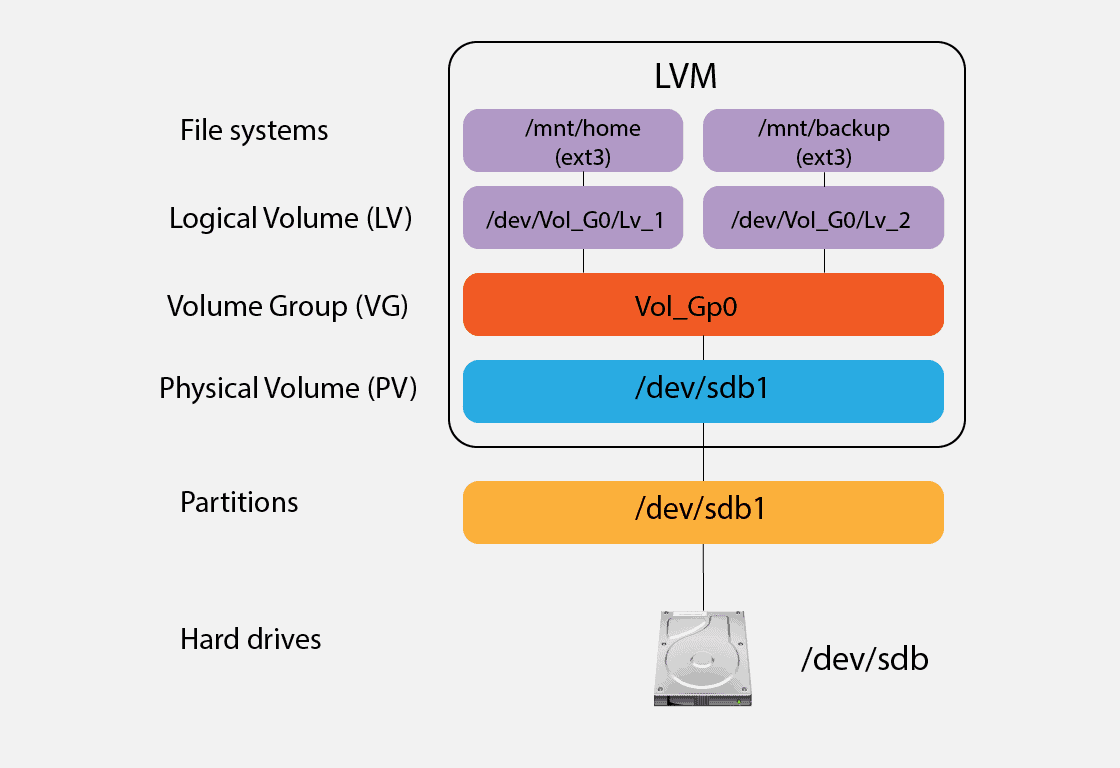
Basic Usage
- Physical Volume (PV) : Disk/Partition initialized for LVM
- Volume Group (VG) : Pool for combining several Physical Volumes (PVs).
- Logical Volume (LV): Carved-out “Virtual Partition” for filesystems.
List Information
Physical Volume (PV):
sudo pvs
Volume Group (VG):
sudo vgs
Logical Volume (LV):
sudo lvs
Create PV, VG & LV
Physical Volume (PV):
sudo pvcreate /dev/sda #if only one disk
sudo pvcreate /dev/sda /dev/sdb #if more than one disk
Volume Group (VG):
sudo vgcreate <VG_NAME> /dev/sda #if only one physical volume to add
Logical Volume (LV):
sudo lvcreate -n <LV_NAME> -L 8G <VG_NAME>
Remove PV, VG & LV
Physical Volume (PV):
sudo pvremove /dev/sda #if only one disk
sudo pvremove /dev/sda /dev/sdb #if more than one disk
Volume Group (VG):
sudo vgremove <VG_NAME>
Logical Volume (LV):
sudo lvremove /dev/<VG_NAME>/<LV_NAME>
#example
sudo lvremove /dev/allvg/lv_home
Modifying Storage Size
Extending an LVM Logical Volume (No Downtime, Safe)
- Check available space in the volume group and decide the amount to extend the size.
sudo vgs
sudo vgdisplay # for more detail
- Extend the logical volume (
lv_home)
- Add 2GB
sudo lvextent -L +2G /dev/allvg/lv_home
- Modern LVM also supports percentage
sudo lvextend -l +100%FREE /dev/allvg/lv_home
- Resize the filesystem after the extending the volume group
sudo resize2fs /dev/allvg/lv_home
# do this while it's mounted
Note:
resize2fssimply updates the metadata and structure to reflect the bigger Logical Volume after a resize.
Note: Filesystem can be grown while mounted for ext4/xfs
- Basically, the space is coming from the volume group (
allvg), so I’m usingvgdisplayto check the availableFree PE/Size. - Then, we can use
lvextend -L +2G ...to extend the space based on theFree PE/Sizeyou have. - Lastly, use
resize2fsto update the partition table.
Output of vgdisplay:
iamyaash@pi5:~ $ sudo vgdisplay
  --- Volume group ---
  VG Name               allvg
  System ID
  Format                lvm2
  Metadata Areas        1
  Metadata Sequence No  2
  VG Access             read/write
  VG Status             resizable
  MAX LV                0
  Cur LV                1
  Open LV               1
  Max PV                0
  Cur PV                1
  Act PV                1
  VG Size               <8.00 GiB
  PE Size               4.00 MiB
  Total PE       r       2047
  Alloc PE / Size       1024 / 4.00 GiB
  Free  PE / Size       1023 / <4.00 GiB
  VG UUID               4KP5xQ-icGT-1G0L-hr8S-2oMc-1cuQ-y71xAz
Shrinking an LVM Logical Volume (Caution!)
Reducing a volume is riskier, always backup before you do anything!
- Unmount the filesystem, because it’s not possible to shrink while it’s mounted:
sudo umount /mnt/lv_home
- Perform a forced filesystem check (mandatory):
sudo e2fsck -f /dev/allvg/lv_home
- Shrink the filesystem
- Reduce to 4GB Total Size
sudo resize2fs /dev/allvg/home 4G
- Reduce the Logical Volume:
sudo lvreduce -L 4G /dev/allvg/lv_home
Note: Never reduce the LV before shrinking the filesystem.
- Remount and verify:
sudo mount /dev/allvg/lv_home
df -h /mnt/lv_home
How to Initialize a Disk with LVM
- Ensure you format the disk, and prepare it for partitioning:
lsblk #list the block of partitions
sudo mkfs.ext4 /dev/sda #ext4 format
- Create Partition Using
parted:
sudo parted /dev/sda
mklabel gpt #set partition table to GPT
mkpart primary ext4 1MiB 80GiB #create 8GB partition
name 1 gpt_home #set partition label
quit # save/write the chages for partitions
Note: Make sure to use
ext4, as it is most recommended format.
# list the available partitions
lsblk
To Remove the Partition:
sudo parted /dev/sda
rm 1 #to remove the partition number 1 (i.e: sda1)
- Create Physical Volume
sudo pvs # list any avail PVs
sudo pvdisplay # more details
sudo pvcreate /dev/sda1 # select the sda1 which is the 80GB partition
- Create Volume Group
sudo vgs
sudo vgdisplay
sudo vgcreate allvg /dev/sda1 # create a new VG name and select the partition as well
- Create Logical Volume
sudo lvs # list the available LVs
sudo lvdisplay
sudo lvcreate -n lv_home -L 44G allvg # create 44GB LV with LV name as lv_home
Scan the disk for LVM usage:
sudo lvmdiskscan
Format the LV (Virtual Partition) as ext4:
sudo mkfs.ext4 /dev/allvg/lv_home
- Mount Logical Volume
sudo mkdir /mnt/lv_home
sudo mount /dev/allvg/lv_home /mnt/lv-home
- Mount Automatically At Boot
lsblk -f # list partition blocks along with other information such as UUID
# or
blkid | grep dev/sda # to see all UUIDs
Locate the UUID of you logical volume, especially note the ext4 format UUID not the LVM_Member.
sudo nano /etc/fstab
Add this line into /etc/fstab:
UUID=44bbb6b2-803e-4009-b8f5-e4fbcd743aff /mnt/lv_home ext4 defaults 0 2
How to Fully Reinitialize a Disk (In case you messed up)
Ensure your disk is not mounted or used by your operating system, because these steps destroy all data on the disk(s) involved.
- Unmount Logical Volumes, if mounted:
sudo umount /mount/point
- Remove Logical Volume (LV)
# list the available LVs
sudo lvs
# remove the selected LV
sudo lvremove /dev/<VG_NAME>/<LV_NAME>
- Remove the Volume Group (VG)
# list the available VGs
sudo vgs
# remove the selected VG
sudo vgremove <VG_NAME>
- Remove the Physical Volume (PV)
# list the available PVs
sudo pvs
# remove the PV
sudo pvremove /dev/sdX
Substitute
/dev/sdXwith your partition name where the PV is created.
- Remove Partitions To Start Fresh
Use tools like mkfs to format and fdisk or parted to create partitions.