Why Airfiber?
I’m living in a remote area, and getting internet connection is nearly impossible. Fortunately, I was able to get an Airfiber connection from Jio, and I have been using that as my primary internet source for a while. I started using Raspberry Pi, broke some things and I have been using locally hosted services, then I got a free domain name using my college student email, and I decided to host my own services on public domain only to find out that I need static IP to host applications. Which is not possible, if you are using cellular internet connection, because it changes frequently.
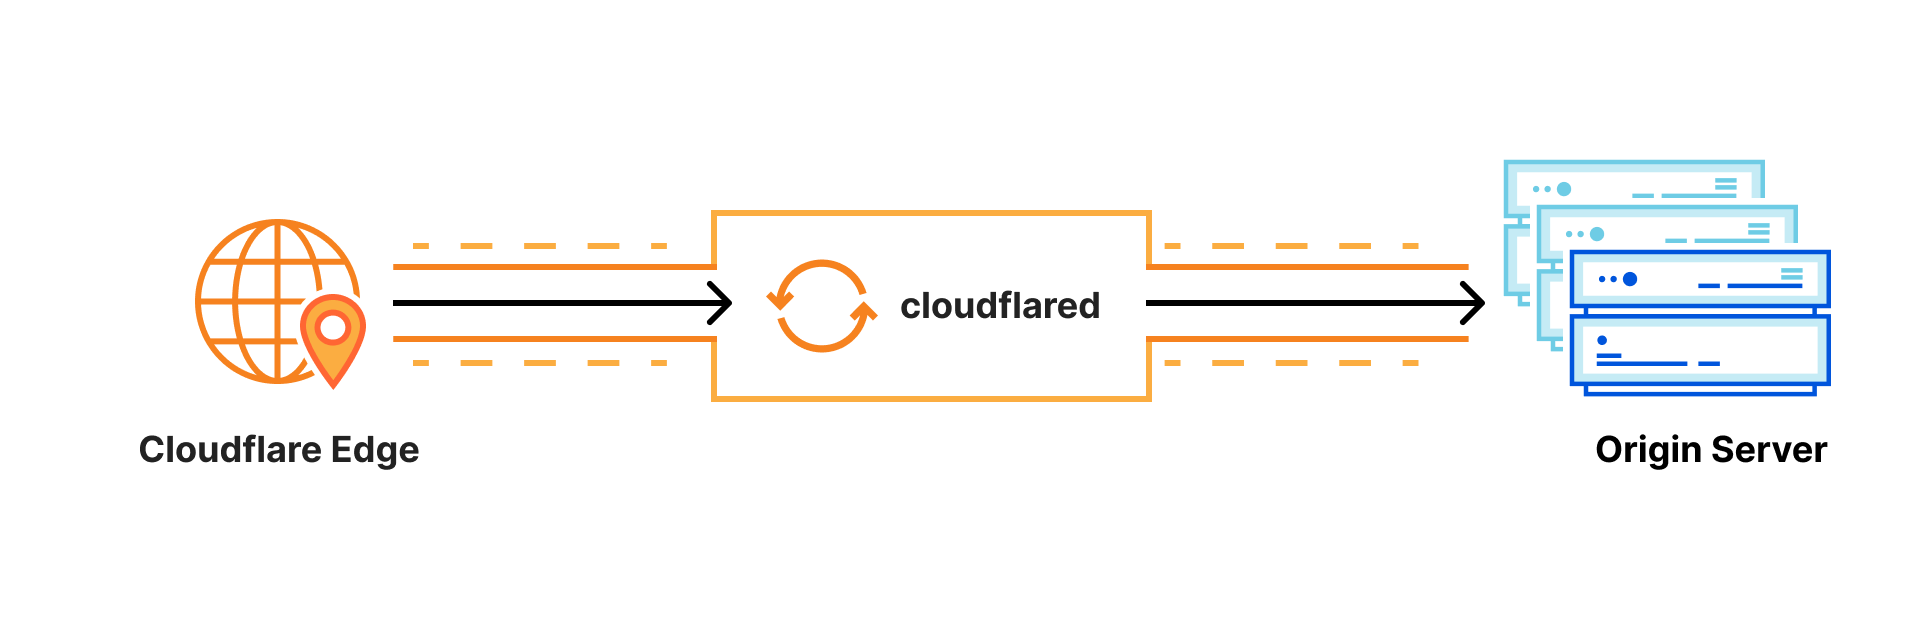
I started digging into this issue, and that eventually led me to Cloudflare tunnels which helped me host servcies even with Airfiber/Cellular internet connection. The process is straightforward and simple, but I did faced some errors in the beginning but I found a workaround to make it happen. This post will be about how to host services on public domain with the help of Cloudflare tunnels and let’s get started!
Getting Started
Install cloudflared
Fedora/RHEL (
rpm-based distros):- Add Cloudflare’s repository:
curl -fsSl https://pkg.cloudflare.com/cloudflared.repo | sudo tee /etc/yum.repos.d/cloudflared.repo- Install
cloudflared:
sudo yum update && sudo yum install cloudflaredDebian/Ubuntu (
apt-based distros):- Add Cloudflare’s package signing key:
sudo mkdir -p --mode=0755 /usr/share/keyrings curl -fsSL https://pkg.cloudflare.com/cloudflare-public-v2.gpg | sudo tee /usr/share/keyrings/cloudflare-public-v2.gpg >/dev/null- Add Cloudflare’s
aptrepo to youraptrepositories`:
echo "deb [signed-by=/usr/share/keyrings/cloudflare-public-v2.gpg] https://pkg.cloudflare.com/cloudflared any main" | sudo tee /etc/apt/sources.list.d/cloudflared.list- Install
cloudflared:
sudo apt-get update && sudo apt-get install cloudflaredArch
pacman -Syu cloudflaredOthers such as pre-built binaries, Docker, Windows, mac-OS and more.
Create Cloudflare Tunnel
- Login into your Cloudflared account using
cloudflared:
cloudflared tunnel login
- Running this command will prompt you the link to log into your Cloudflared account and also opens the default browser with the provided link.
- Also, it generates an account certificate, which will be used for cloudflared authentication purposes.
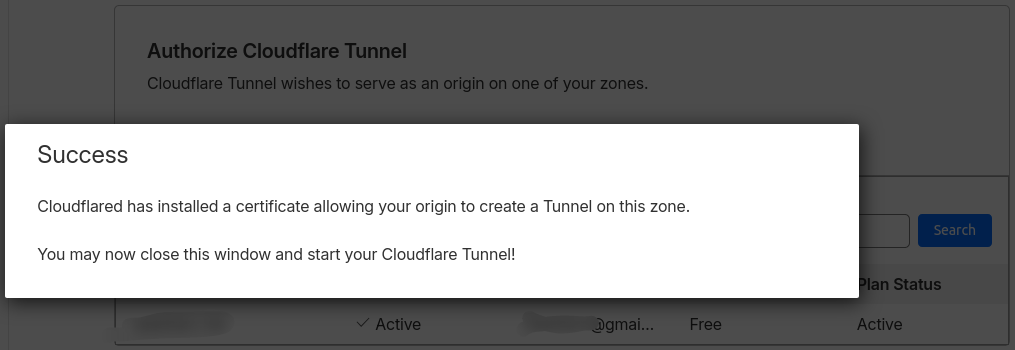
Ensure you see this ‘Success’ page after authorization and proceed to the next step.
- Create a Tunnel
cloudflared tunnel create <TUNNEL_NAME>
Sample Output:
iamyaash-lubuntu@lubuntu:~$ cloudflared tunnel create l-tunnel
Tunnel credentials written to /home/iamyaash-lubuntu/.cloudflared/75xxxx46-xxxx-xxxx-xxxx-xxxxxxxxxxxx.json. cloudflared chose this file based on where your origin certificate was found. Keep this file secret. To revoke these credentials, delete the tunnel.

Created tunnel l-tunnel with id 75xxxx46-xxxx-xxxx-xxxx-xxxxxxxxxxxx
Copy the UUID because you’ll need it later!
- Running this command creates a credential file into
~/.cloudflared/*.json(default directory) - Create a tunnel by establishing a persistent relationship between the name you provide and a UUID for your tunnel.
- However, there’s no connection is active currently within the tunnel yet. Because, we need to configure the tunnel before establishing any connection.
- Verify the tunnel has been created successfully
cloudflared tunnel list
Configure Cloudflare Tunnel
- Create a
config.ymlinside the~/.cloudflared/directory
touch ~/.cloudflared/config.yml
- Add these lines into
config.yml:
nvim config.yml
tunnel: <UUID>
credentials-file: /home/<username>/.cloudflared/<TUNNEL_ID>.json
origincert: /home/<username>/.cloudflared/cert.pem


ingress:
  # Rules map traffic from a hostname to a local service:
  - hostname: <SUB-DOMAIN>.<DOMAIN_NAME>
    service: http://localhost:8088

  - service: http_status:404
- Paste the tunnel id you copied before in
<UUID>. - Point both the
credentials-file&origincertto the correct location. - Ensure, you enter the right sub-domain & domain name to the application you would like to host.
Start Routing Traffic (Public Network Only)
Assign a CNAME record that points traffic to your tunnel subdomain:
cloudflared tunnel route dns <UUID or Tunnel Name> <hostname>
CNAME (Canonical Name)record is a type of DNS record that maps an alias domain name
blog.ex.comto a “canonical” or true domain such asex.com. It simply points to the same destination without using an IP address, as they pointing to the same domain address.
Example:
cloudflared tunnel route dns airfiber-tunnel jellyfin
Run cloudflared Tunnel
Run as Native Tunnel
- Run the tunnel normally like this:
cloudflared tunnel run <UUID or Tunnel Name>
- In case you a custom configuration file, in a different location, then execute this command:
cloudflared tunnel --config /path/to/your/custom/config.yml run <UUID or Tunnel Name>
Run as Systemd Service
Ensure cloudflared tunnel configurations exist inside the ~/.cloudflared/.
- Install
cloudflaredservice:
cloudflared service install
# Use this command, in case it shows error incorrect location of config.yml
sudo cloudflared --config /home/USERNAME/.cloudflared/config.yml service install
- Start the service:
sudo systemctl start cloudflared
- Verify whether the service is running or not:
sudo systemctl status cloudflared
- Ensure the service is enabled, else it won’t start after boot:
sudo systemctl enable cloudflared
- Restart the service every time you make changes to
~/.cloudflared/config.yml:
sudo systemctl restart cloudflared